It could be necessary to replace the charging port on your iPhone X if it isn’t charging correctly or if it is loose or unresponsive. You will be guided step-by-step through the process by this beginner’s instruction.
-Tools and Materials Needed:
-Pentalobe (P2) screwdriver
-Phillips (PH00) screwdriver
-Plastic opening tool
-Suction cup
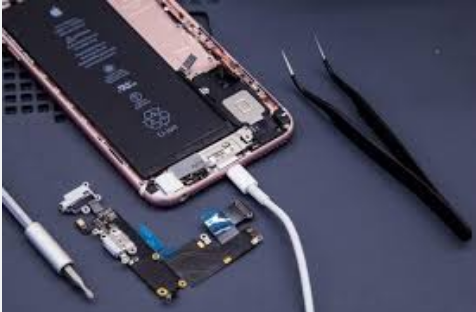
-Tweezers
-a substitute charging port
-First, turn off your iPhone X.
-Make sure your iPhone X is fully off the power source before starting. When the power off slider shows up, hold down both the side and either volume button. Then, slide it to turn off the power.
Step 2: Take Out the Lower Screws.
The two screws on either side of the charging port at the bottom of the iPhone X can be removed with the Pentalobe (P2) screwdriver.
Step 3: Slide the iPhone open.
Position the suction cup slightly above the home button and slowly raise it to allow a tiny space to open up between the body and the display. To release the glue, carefully work your way around the perimeter of the gap with the plastic opening tool inserted. Take care not to harm the phone’s right side’s display cables.
Step 4: Cut the Battery Off
When the display is free, carefully open the phone, holding the display to the right, like you would a book. After removing the screws holding the battery connector bracket in place with the Phillips (PH00) screwdriver, remove the bracket itself. Gently peel the battery connector out of the logic board using a plastic tool.
Step 5: Take the Screen Off
After that, unplug the display connectors by taking out the screws holding them in place. Remove the display with care, then place it aside.
Step 6: Take the Speaker Out
You must take off the loudspeaker in order to get to the charging port. After taking out the screws holding the loudspeaker in place with a Phillips screwdriver, carefully lift it out using tweezers.
Step 7: Remove the Taptic Engine in Step Seven.
It’s also necessary to remove the Taptic Engine, which is situated beneath the battery. After taking out the screws holding it in place with a Phillips screwdriver, carefully lift it out with tweezers.
Step 8: Disconnect the charging port in step eight.
Now that the charging port is clearly visible, detach the charging port flex wire from the logic board and use the Phillips screwdriver to loosen the screws holding the charging port bracket.
Step 9: Take Out the Old Charging Port in Step 9
Take off any last screws holding the charging port in place. Remove the old charging port from the iPhone by carefully prying it up. The microphone should be handled with caution because it is affixed to the charging port assembly.
Step 10: Installing the New Charging Port in Step 10
Make sure the new charging port is correctly aligned and place it in the same spot as the previous one. Put the screws back in place that you previously removed, then reattach the charging port flex cable to the logic board.
Step 11: Put the iPhone back together
Put the loudspeaker and Taptic Engine back in place by tightening the corresponding screws. Reattach the logic board’s display connectors, making sure to tighten the screws. After reconnecting it, use the battery connector bracket to keep the battery connector in place.
Step 12: Put the iPhone away.
To set the adhesive in place, carefully line up the display with the iPhone’s body and softly but firmly press down on the edges. Put the two Pentalobe screws back in the phone’s bottom.
Step 13: Turn the power on and To make sure the new charging port is functioning properly, check the power on your iPhone X and its functionality. Make sure your phone detects the connection and starts charging when you plug in your charger.
You have now successfully fixed your iPhone X’s malfunctioning charging port. Even novices may complete this repair with the correct tools and cautious execution, although it does take time and attention to detail.