Although the Samsung Galaxy S20 is known for having a superb camera, mishaps do occur and occasionally the lens might sustain damage. Don’t worry if the camera lens on your Galaxy S20 becomes scratched up or breaks; with the correct tools and patience, you can replace it yourself. This in-depth manual will take you step-by-step through the procedure.
Required Equipment and Supplies
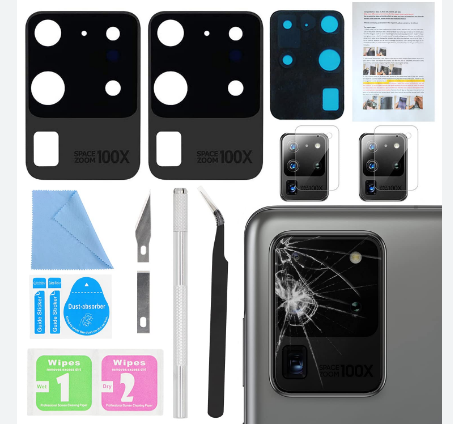
Make sure you have the following supplies and tools before you start:
-Replacement camera lens
-Precision screwdriver set
-Plastic opening tools
-Tweezers
-Adhesive tape or glue
-Hairdryer or heat gun
-Isopropyl alcohol and microfiber cloth
-First, turn off your device.
-First and foremost, safety! Turn off your Galaxy S20 entirely to start. By doing this, any unintentional harm to the internal parts during the repair procedure is avoided.
Step 2: Take the rear cover off.
You must weaken the adhesive because the Galaxy S20’s back cover is firmly attached to the frame. Apply light heat over the rear cover’s edges using a hair dryer or heat gun. Take care not to let the gadget become too hot. Using a plastic opening tool, carefully pull off the back cover once the adhesive has weakened. Work your way around the edges, starting at a corner, until the cover comes off entirely.
Step 3: Cut the Battery Off
After removing the back cover, find the battery connector and disconnect it using tweezers or a plastic tool. To make sure the item is powered down while you work on it, this step is essential.
-Remove the camera module in step four.
-The screws holding the camera module in place must then be removed. To carefully loosen them, use a precision screwdriver.
-After taking out the screws, carefully remove the camera module from the apparatus. Take caution when handling it to prevent breaking any other parts.
Step 5: Change the Broken Lens in the Camera
You can concentrate on the damaged lens now that the camera module is removed. If the lens is fractured, you might need to gently remove any broken parts with tweezers. To make sure there is no debris or adhesive residue left behind, use isopropyl alcohol and a microfiber cloth to clean the area surrounding the lens.
Wrap the edges of your replacement camera lens with a thin layer of glue or adhesive tape. Place the replacement lens over the camera module with caution, then firmly press it in place. Verify that it is properly positioned and fastened.
Step 6: Put the Device Back Together
Now that the new lens is installed, it’s time to put your Galaxy S20 back together. To begin, carefully reposition the camera module and fasten it using the screws you previously removed. Make sure the battery connector is firmly affixed before reconnecting it.
Step 7: Put the Back Cover back on
Make sure the adhesive is still sticky enough to hold the back cover in place before reattaching it. In the event that it isn’t, you can reapply glue or adhesive tape to the edges. Press the back cover firmly into place after aligning it with the device. To guarantee a snug fit, gently press along the edges.
Step 8: Turn on and check
After putting everything back together, turn on your Galaxy S20 and check the camera to make sure the replacement lens is working properly. The quality of the image may be impacted by dust or debris inside the camera module, so look for any evidence of this.
In summary
Although fixing the camera lens on your Samsung Galaxy S20 may appear difficult, it is doable with the correct equipment and a little perseverance. You may conduct the repair yourself and save time and money by using this thorough tutorial. You may quickly resume taking amazing pictures with your Galaxy S20 if you just work cautiously and deliberately.