The iPhone 12 is a strong gadget, but like all smartphones, it has a limited battery life and can lose some of its effectiveness over time. Changing the battery can revitalize your gadget and give it new life. This comprehensive how-to will walk you through replacing the iPhone 12’s battery
Required Equipment and Supplies
Prior to beginning the battery replacement, collect the required supplies and tools:
-A replacement battery for iPhone 12
-A Pentalobe screwdriver (P2)
-A Phillips screwdriver (PH000)
-A suction cup
-Plastic opening tools
-A spudger
-Tweezers
-Adhesive strips for the battery
-Hair dryer or heat gun
-First, turn off your iPhone.
-Make sure your iPhone 12 is turned off first and foremost. Until the power-off slider displays, hold down the side button and any of the volume buttons. To switch off your smartphone, slide it.
Next, take out the Pentalobe screws.
The two screws on either side of the Lightning port at the bottom of the iPhone can be removed with the Pentalobe screwdriver. You’ll need these screws for reassembly, so keep them secure.
Step 3: Warm the Screen’s Edges
Apply light heat to the screen’s edges using a hairdryer or heat gun. As a result, the adhesive becomes softer and the screen is easier to lift. Take care not to overheat the gadget since high temperatures can harm internal parts.
Step 4: Make use of the opening tool and suction cup
Position the suction cup slightly above the home button region, close to the screen’s bottom border. Pull up the suction cup gently to leave a tiny space between the phone’s body and screen. To lift the screen, place the plastic opening tool into the opening and carefully maneuver around the edges. Take your time and exercise caution to prevent any display damage cables.
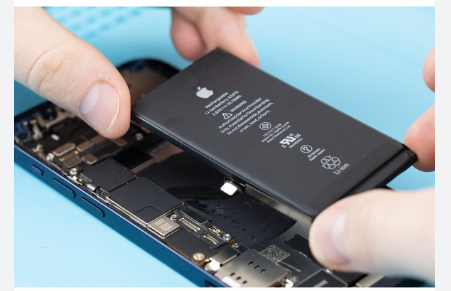
Step 5: Cut the Battery Off
Upon lifting the screen, multiple connectors will be seen. The screws holding the battery connector cover in place can be taken out using a Phillips screwdriver. Lift the lid carefully, then use a spudger to detach the battery connector so that the phone won’t charge while you work.
Sixth Step: Take Out the Old Battery
Pull the adhesive strips at the battery’s bottom gently. If the strips break, pull the battery off using a plastic card or spudger. Because it can be dangerous, take care not to puncture the battery.
Installing the New Battery in Step 7
Inside the battery compartment, insert the fresh adhesive strips. Press the replacement battery firmly onto the adhesive after aligning it. After replacing the connector cover and reconnecting the battery connector, fasten it firmly with the screws you previously removed.
Step 8: Reinstall the Display
Press the display cables into place after carefully aligning them. Press the screen back into the frame with gentle pressure to replace it. Press all the way around the borders of the screen to make sure it’s securely installed.
Step 9: Pentalobe Screw Replacement
Lastly, replace the two screws on either side of the Lightning port using the Pentalobe screwdriver.
Turn on and test in step ten.
Switch on the iPhone 12 and give the upgraded battery a try. Verify that the phone turns on properly and that the screen and other features operate as they should.
In summary
Although changing the battery on an iPhone 12 can appear difficult, it is a procedure that can be completed with caution and the appropriate tools. With the help of this instruction, you should be able to change the battery in your iPhone 12 with ease, prolonging its lifespan and bringing it back to peak performance.